At first glance setting a height dynamically for table view cells seems a little daunting and the first most obvious answers that come to mind are not necessarily correct. In this post I will show you how to set your table view cell heights dynamically based upon the text content without subclassing UITableViewCell. You can subclass it, however, doing so does not make the code much cleaner as setting the height is done in your delegate for the table view itself rather than the cell anyhow. Read on to see what you need to know to make dynamic cell height sizing a breeze. There are probably numerous reasons why you might want dynamic heights for your table view cells, but the one I’ve run into most is the need to resize because I am displaying lists of text objects with varying lengths. When the text is short, it might fit in the normal cell label, however, if the text gets longer, you will want to resize the cell so that you can display the complete content. I’ve distilled the process of resizing table cells to a few rules of thumb. Here they are:
- Create, configure, and add a UILabel as a subview of the contentView in the cell.
- Calculate the height in the UITableView delegate method, – (CGFloat)tableView:(UITableView*)tableViewheightForRowAtIndexPath:(NSIndexPath *)indexPath;
- Calculate the frame for the UILabel in the UITableView delegate method, – (UITableViewCell*)tableView:(UITableView*)tableView cellForRowAtIndexPath:(NSIndexPath *)indexPath;
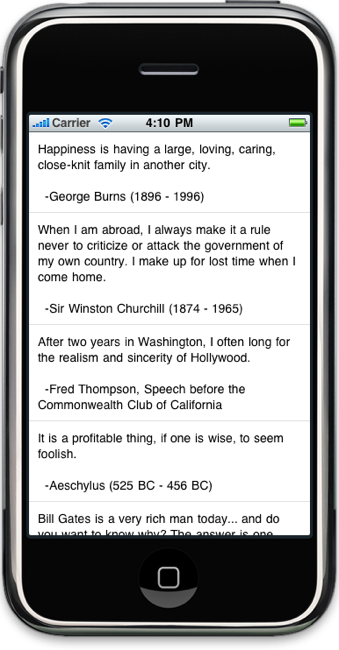
I am going to cover each of these rules in detail, but take a look at the output of the example project in the screenshot.
Add a UILabel to the Cell
In simpler table view based applications, you can simply set the text of the table view cell’s text label like this:
Doing so might make you think that you can manipulate the UILabel that the cell uses, however, I’ve found my attempts to change the UILabel’s frame get ignored completely, so it is not a good candidate for use with our dynamic resizing code.
Instead what we need to do is programatically create a UILabel and add it to the cell’s content view. Do this in the call to -cellForRowAtIndexPath. Use something like the following code:
This is not the completed code as you’ll notice that we have initialized the label only when the cell needs created for the first time, that is if (cell == nil) after a call to -dequeueReusableCellWithIdentifier. There are two points I want to address in relation to this. First, notice the label has a tag associated with it after a call to -setTag:1. This will be used in the case where the cell is not equal to nil after a call to -dequeueReusableCellWithIdentifier. In that case we will need to get a handle to the label by calling [cell viewWithTag:1] which will return the view that we associated with that tag. Second, notice that we have added our label to the cell’s content view with a call to [[cell contentView] addSubview:label]. This is done when the label is initialized and should only be done once. Adding it each time this method is called will add the label again to the subviews array. We will come back to this code to finish it in a minute, but first let’s take a look at how we can set the height for our cell now that our label has been added.
Calculate the Cell Height
In a complex cell, your calculations could get a bit challenging, however, you only need to worry with the items that will change in height. In our example, the only item you need to deal with is the label that we added. We calculate the height of the cell by determining the size of the text based on the length of the text and the font we intend to use. TheNSString class provides a method called -sizeWithFont that enables us to obtain this size. The following code show how we implement our call to -heightForRowAtIndexPath:
You will notice that we have several constants we are using to calculate the size of our cell. These are defined as follows:
The constant CELL_CONTENT_WIDTH is the width of the entire cell. CELL_CONTENT_MARGIN is the margin we want to use all the way around the cell as the content inset, and of course FONT_SIZE is the size of the font we want to use for the label text.
The first place we use these is to create a constraint with the content width. Notice that CGSizeMake takes as its first parameter the total content width minus the margin times 2. This subtracts the margin from the left and the margin from the right from the total width to have the actual width of the label. The second parameter is just a maximum number we provide. The call to -sizeWithFont will set this to the actual height in the next line. This call to -sizeWithFont calculates the size according to the constant UILineBreakModeWordWrap which causes it to return the correct size for word wrap–which is why the width is important to get right. Next we set our height for the cell using a call to the MAX macro. This will ensure that our cell height will never be shorter than the default 44 pixels as MAX returns the larger of the two variables. Finally, we add our margin height back into the height for both top and bottom (hence x 2) and then return the result.
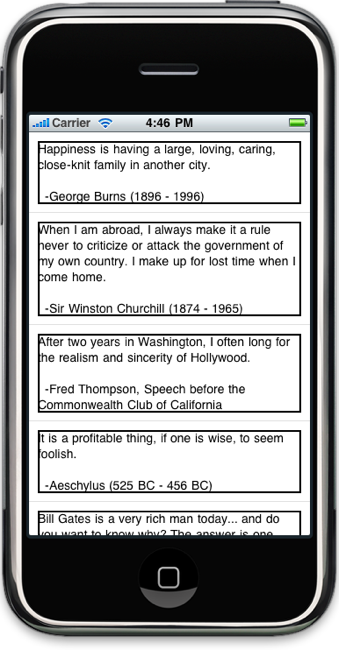
To help visualize how the margin is working, take a look at the following screenshot to see what each label looks like with a border around it. Turning this on with a call to [[label layer] setBorderWidth:2.0f] on the UILabel we added in the previous section makes it clear where the margins are.
Calculate the UILabel Frame and Set It
The same calculation we used to determine the height in the previous section is the code we use to set the frame for the UILabel we added in the beginning. To complete this tutorial we will finish out our implementation of -cellForRowAtIndexPath with the following code.
Just remember that anything done within the if (cell == nil) block is initialization code and should only be done when the cell is first created. Anything done outside of the block will be used every time the -cellForRowAtIndexPath is called, which is any time the data gets reloaded or the view gets scrolled.
That being said, you will see that the only thing we do every time it gets called is setting the text of the current item and setting the label’s frame for the current item (lines 32 and 33). Notice that we got a handle to our UILabel by calling [cell viewWithTag:1] (lines 29 and 30) in the case where the label is nil in subsequent/non-initialization calls to this method. You will notice that our frame calculation code is exactly the same as what we used in the previous section to determine the row height.
Conclusion
Calculating dynamic cell heights is really not too hard. If you have a very complex cell, just remember that all you really need to calculate is the height based up a width that shouldn’t change and the size of the text of a certain font (unless of course you support both portrait and landscape modes–which makes things a little more challenging. I will, however, leave this as an exercise for the reader). If you find yourself wondering where your actual frame is displaying for a given view, just turn on the view border by calling [[view layer] setBorderWidth:2.0f]. This will help you see what is going on and give you the ability get to the bottom of your display problems quicker. Until next time.


0 comments:
Post a Comment